



You can check your motherboard model in Windows 11 without opening the PC. The quickest method is System Information. Press Windows + R, type msinfo32, press Enter, then look for BaseBoard Manufacturer and BaseBoard Product under System Summary.
PowerShell gives the same type of information in a cleaner text format. It is now the better command-line option on current Windows 11 versions. Microsoft removed the old WMIC command-line utility from Windows 11 version 24H2 and later in August 2026. Microsoft’s Windows feature documentation confirms the removal.
Knowing the exact board model helps when you need the correct BIOS file, new RAM, a CPU upgrade, storage expansion or replacement hardware. It can save you from ordering a part that does not fit or downloading firmware for the wrong board.
Quick Ways to Find Your Motherboard Model
| Method | Best for | Extra software needed? |
| System Information | Fastest option for most Windows users | No |
| PowerShell | Copying exact board details | No |
| CPU-Z | Seeing board, chipset and BIOS details together | Yes |
| BIOS/UEFI | Checking details outside Windows | No |
| Physical inspection | Confirming a model when software shows generic data | No |
For most people, start with System Information. Use PowerShell if you want a result you can copy. Try CPU-Z or a physical check if Windows reports a vague value such as “Default string” or an OEM part number that you do not recognise.
Method 1: Check the Motherboard Model in System Information
System Information is the simplest built-in option in Windows 11. Microsoft Support describes System Information as a Windows utility that displays hardware, system component and software environment information.
Follow these steps:
- Press Windows + R.
- Type
msinfo32. - Press Enter.
- Select System Summary in the left panel if it is not already open.
- Find BaseBoard Manufacturer.
- Find BaseBoard Product.
- Record BaseBoard Version if Windows provides one.
The manufacturer field tells you who made the motherboard. The product field normally identifies the board model or board part number.
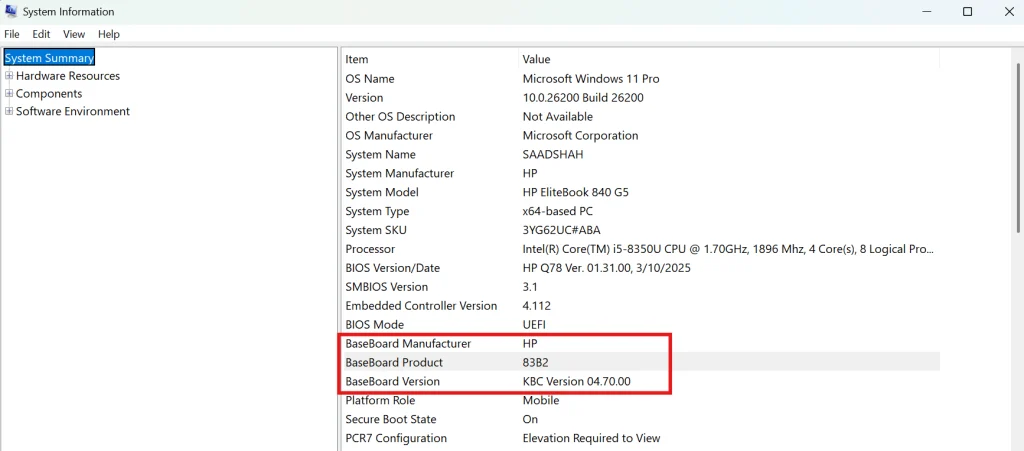
For a custom desktop, you may see a recognisable result such as ASUS, MSI, Gigabyte or ASRock followed by a board model.
Prebuilt PCs and laptops can be different. The BaseBoard Product field may contain an internal OEM identifier rather than the retail name you would see on a motherboard box.
Method 2: Find the Motherboard Model with PowerShell
PowerShell is the best command-line method on a current Windows 11 PC.
Open Start, search for PowerShell or Terminal, then open it.
Run this command:
Get-CimInstance -ClassName Win32_BaseBoard | Select-Object Manufacturer, Product, Version, SerialNumber
PowerShell should return four useful fields:
- Manufacturer: motherboard maker
- Product: motherboard model or board identifier
- Version: hardware revision where supplied
- SerialNumber: board serial number where supplied by the manufacturer

Microsoft documents Win32_BaseBoard as the Windows Management Instrumentation class for the physical baseboard. This makes it the right data source when the goal is the motherboard itself rather than the complete PC model.
If you only need the manufacturer and model, use the shorter command:
Get-CimInstance Win32_BaseBoard | Select-Object Manufacturer, Product
This method is useful when you want to copy the result into a support ticket, compare several machines or save hardware details before an upgrade.
Why the Old WMIC Command May Not Work
Older guides often recommend:
wmic baseboard get product,manufacturer,version
That command should no longer be the default advice.
Microsoft removed the WMIC command-line utility from Windows 11 version 24H2 and later in August 2026. WMI itself remains available. PowerShell’s CIM commands are the current route for querying the same management data.
If wmic returns an error or Windows says the command cannot be found, use the PowerShell command above instead.
Method 3: Check the Motherboard with CPU-Z
CPU-Z is useful when you want more than the model name.
Download CPU-Z from the official CPUID website, install it or use the downloadable ZIP package, then open the Mainboard tab.
You should see information such as:
- Manufacturer
- Model
- Chipset
- Platform details
- BIOS brand
- BIOS version
- BIOS date
CPUID states that CPU-Z reads mainboard, chipset and memory information and supports Windows 11.
This method is useful before a BIOS update or hardware upgrade since the chipset and BIOS details sit on the same screen. Stick to the official CPUID download page. There is no reason to use an unknown download mirror for a hardware-identification tool.
Method 4: Check the Model in BIOS or UEFI
The BIOS or UEFI can help when Windows does not provide a useful motherboard name.
Restart the PC and enter the firmware setup screen. The key varies by manufacturer, but Delete and F2 are common on desktop motherboards. Branded laptops and prebuilt systems may use another key.
Look for pages named:
- Main
- System Information
- Hardware Information
- Board Information
The exact menu differs between manufacturers.
Some firmware screens show the motherboard model directly. Others show the system model, BIOS version and serial information instead.
Method 5: Read the Model Directly from the Motherboard
Physical inspection is the most direct fallback for a desktop PC.
Shut the computer down, switch off the power supply, unplug the mains cable and remove the side panel.
Look for printed text on the motherboard. Manufacturers often place the model name near the RAM slots, PCIe slots, CPU socket or centre of the board.
A model may look like:
- ASUS TUF GAMING B650-PLUS
- MSI B760 GAMING PLUS WIFI
- GIGABYTE B650 AORUS ELITE AX
- ASRock B650M Pro RS
The exact location changes from one board layout to another.
You may need to move a cable aside to read the text, but avoid removing components if the model is already visible.
Laptops are different. Opening one just to find the motherboard model rarely makes sense. Use System Information, PowerShell or the manufacturer’s support page first.
What If Windows Shows “To Be Filled by O.E.M.” or a Generic Name?
Windows can only display the motherboard information supplied through the system firmware. Microsoft notes that hardware information returned through Windows management tools relies on data provided by the hardware manufacturer.
That explains results such as:
- To Be Filled by O.E.M.
- Default string
- System Product Name
- Base Board
- An unfamiliar part number
Try PowerShell and System Information first. If both show the same generic value, use CPU-Z, BIOS/UEFI or inspect a desktop board physically.
For a Dell, HP, Lenovo, Acer or another branded PC, searching the manufacturer’s support page with the computer’s exact model or service identifier can be more useful than searching the internal board code.
Why Do You Need to Know Your Motherboard Model?
The motherboard model affects many upgrade and support decisions.
BIOS Updates
BIOS files are board-specific. A model name that looks close is not good enough. Check the board and revision before downloading firmware from the manufacturer’s support page.
CPU Compatibility
A processor must match the motherboard socket and supported chipset. BIOS support can matter for newer processors on an older compatible socket.
RAM Upgrades
The board determines supported memory generation, slot count, capacity limits and validated speeds. Checking the model gives you a direct route to the manufacturer’s memory specifications.
PC Case Compatibility
Motherboard form factor matters when choosing a case. ATX, Micro-ATX and Mini-ITX boards need a case that supports their size and mounting points.
If you are planning a rebuild, comparing the board size with the available PC case sizes, airflow and compatibility options can help you avoid buying a case that does not fit the board properly.
Hardware Troubleshooting
Knowing the board model makes driver, BIOS and support searches much more precise.
If you are checking motherboard details after random shutdowns or a no-power fault, testing the PC power supply is a useful next diagnostic step before treating the motherboard as the failed component.
Which Method Should You Use?
- Use System Information if you only need the model name quickly.
- Use PowerShell when you want clean text that is easy to copy.
- Use CPU-Z when you need the motherboard, chipset and BIOS information on one screen.
- Use BIOS/UEFI when Windows is unavailable or its result looks wrong.
- Use physical inspection for a desktop board when software reports generic data and you need a definitive printed model.
For a current Windows 11 PC, skip old WMIC instructions and use PowerShell instead.
Frequently Asked Questions
Can I Check My Motherboard Model Without Opening My PC?
Yes. Open System Information with msinfo32 and read BaseBoard Manufacturer and BaseBoard Product. PowerShell can return the same data with Get-CimInstance Win32_BaseBoard.
Does Device Manager Show the Motherboard Model?
Device Manager lists hardware devices and drivers, but it is not the clearest place to identify the motherboard model. System Information or PowerShell gives a more direct result.
Can I Find the Motherboard Model in Command Prompt?
The old wmic baseboard command appears in many older tutorials, but WMIC has been removed from Windows 11 24H2 and later. Use PowerShell with Get-CimInstance Win32_BaseBoard on current Windows 11 systems.
Is the Motherboard Model the Same as the PC Model?
No. A PC model identifies the complete computer. A motherboard model identifies the main system board inside it. On branded PCs, the motherboard may use an OEM part number that differs from the computer’s retail model name.
What Motherboard Information Do I Need for a BIOS Update?
Record the manufacturer, exact model and hardware revision if one is shown. Then use the support page for that exact board. Follow the manufacturer’s BIOS instructions and confirm that the firmware file matches the board before starting an update.
